Arm balances, inversions, and core strength
In this section, you’ll learn to integrate all the muscles of the core to root down through the arms and lift higher into five arm balances and inversions. While flexibility in the spine and hips is important in challenging arm balances and inversions, it’s no guarantee of success if you don’t have the needed upper-body and torso strength. The hidden ingredient to success in arm balances and inversions is abdominal strength, which is required to support and stabilize the center of your body. In many arm balances, the abdominal muscles must contract even more strongly to fight gravity and lift the weight of your pelvis and legs off the floor. So if you’ve come to yoga in the past without a regular practice in core work, arm balances are likely to be a study in frustration.
Once you understand the five arm balances and inversions, then you can practice them on their own and by using our 12-minute video that weaves the poses together into one powerful sequence.
Arm Balances and Inversions
Staff Pose
Sanskrit name: Dandasana
Translation: danda = staff • asana = pose
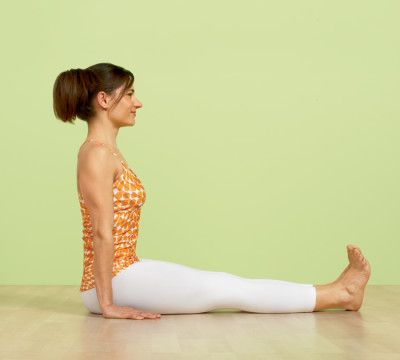
Sit on the floor with your legs together and extended in front of you. If your torso is leaning back, it may be because a weak psoas and tight hamstrings are dragging the sitting bones toward the knees and the back of the pelvis toward the floor. If that is the case, sit on a blanket or a bolster to lift the pelvis.
Press your palms into the floor alongside your hips. Ground down through your sitting bones and without hardening your belly, firm your thighs, pressing them down against the floor (or your blanket or bolster). Rotate your thighs slightly toward each other, and draw the inner groins toward the sacrum. Flex your ankles and spread your toes, pressing out through your heels. Dig your heels into the ground to feel the backs of the legs engage.
Inhale to engage the erector spinae muscles lengthen through the spine, lift the chest, and bring the top of the sacrum up and in. Maintain a small curve in your lumbar spine as you exhale to pull your lower belly up and in. To lengthen your front torso perpendicular to the floor, think of energy, or prana vayu, streaming upward from the pubis (the bones that form the pelvis) to the sternum (breastbone), through the crown of the head, then down the back from the shoulders to the tailbone, with the tail lengthening into the floor.
Imagine your spine as the “staff” at the vertical core of your torso, rooted firmly in the Earth, the support and pivot of all you do. Hold the pose for one minute or longer. Then exhale to release. Though Staff Pose might not be what you'd expect when you hear "arm balance," it's foundational to finding the core engagement you need for many arm balances and inversions.
Pendant Pose, variation
Sanskrit name: Lolasana, variation
Translation: lola = fickle, frequently changing, trembling, quivering, or dangling to and fro like an earring • asana = pose
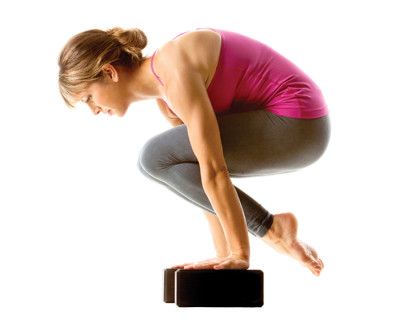
From Downward-Facing Dog (Adho Mukha Svanasana), lower onto your shins with your knees touching. Place a block at medium height alongside each leg, halfway between your knees and toes.
Press your palms firmly into blocks and straighten your elbows. Round your back, pull your navel toward your spine, and bring your thighs to your chest. Keep your hips low, your knees together, and the tops of your feet on the floor.
Holding this position, pick up your right foot and bring your right heel as close to your sitting bone as possible. Hold for 5 breaths and switch legs. Repeat the pose one more time, trying to pick up both feet off the mat. Don’t be surprised if it’s only a few seconds—and don’t try this unless you feel fairly stable.
Move the blocks to the side and press back to Downward-Facing Dog.
Crane Pose
Sanskrit name: Bakasana
Translation: bak = crane • asana = pose
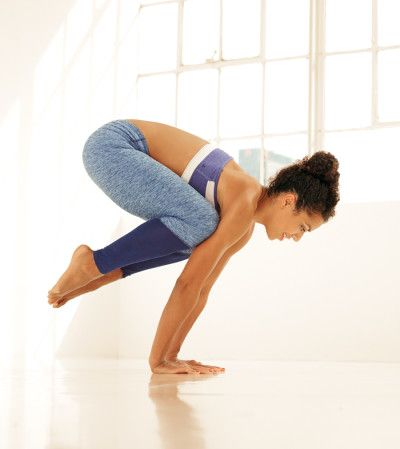
Squat down from Mountain Pose (Tadasana), and bring your big toes together to touch. If it isn’t possible to keep your heels on the floor, support them on a thickly folded blanket. Separate your knees wider than your hips, and bring your hips down as low as you can. Lean your torso forward, between the inner thighs, and bring your knees to the outside of your armpits. Stretch your arms forward, then bend your elbows, placing your hands on the floor and the backs of the upper arms against the shins. Spread the fingers wide.
Squeeze your adductors or inner thighs against the sides of your torso and slide the upper arms down as low onto the shins as possible. Lift up onto the balls of your feet and lift your hips, looking forward and leaning forward even more and taking the weight of your torso onto the backs of the upper arms. Consciously attempt to contract your front torso and round your back completely. To help yourself do this, keep your tailbone as close to your heels as possible.
With an exhalation, tone the abdominal muscles and lean forward even more onto the backs of your upper arms, to the point where the balls of your feet leave the floor. Now your torso and legs are balanced on the backs of your upper arms. As a beginner at this pose, you might want to stop here in Crow Pose (Kakasana), perched securely on the bent arms.
If you are ready to go further, squeeze the legs against the arms, press the inner hands firmly to the floor and on an inhalation, straighten the elbows. Seen from the side the arms are angled slightly forward relative to the floor. The inner knees should be glued to the outer arms, high up near the armpits. Keep the head in a neutral position with your eyes looking at the floor, or lift the head slightly, without compressing the back of the neck, and look forward. Transversus abdominis, rectus abdominis, and your pelvic floor are all engaged.
Stay in the pose anywhere from 20 seconds to 1 minute. To release, exhale and slowly lower your feet to the floor, back into a squat. Counter with Child's Pose (Balasana) until your breath returns to its natural rhythm.
One-Footed Pose Dedicated to the Sage Koundinya I
Sanskrit name: Eka Pada Koundinyasana I
Translation: eka = one • pada = foot • Koundinya = a sage • asana = pose
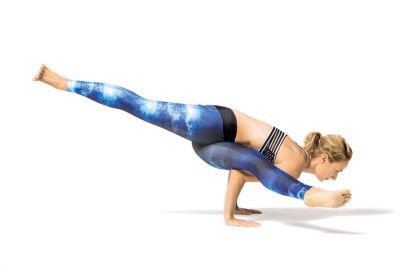
Come into a squat with the big toes and knees touching. Place the right fingertips behind you and then on an inhalation, extend the right arm alongside the ear, stretching the left side body.
To twist, exhale to bring your left waist, side ribs, and shoulder around to the right. Place your left upper arm across your right thigh and slide your left outer armpit down the outside of the thigh. Maintaining this contact high on the arm and far to the outside of the thigh is the secret to the pose. Push your left elbow into your right thigh to deepen the twist.
Place your hands on the floor, shoulder-width apart and fingers spread wide, just as you would for Chaturanga Dandasana. Gaze forward.
Without losing contact between your left arm and your right outer thigh, lift your hips and start to lean forward to bring your whole torso above and between your hands. This should leverage your right foot up in the air. When your right foot is up, lean your weight farther forward until your left foot becomes light and lifts up. Flex your feet. Stay here in Side Crow, taking deep breaths.
If you are ready to move on to Eka Pada Koundinyasana I, inhale to straighten both knees simultaneously. Lift the left leg until it’s parallel to the floor. Bending your left elbow more, lift your right foot higher, and reach out through the balls of both feet. Adjust the height of your right shoulder so it’s the same as the left. Lift your chest and your belly to bring your torso parallel to the floor.
Breathing smoothly, hold the pose for 20 seconds or longer, then exhale to release both feet to the floor. Repeat on the other side for the same length of time before finding a resting pose.
Handstand
Sanskrit name: Adho Mukha Vrksasana
Translation: adho = downward • mukha = face • vrksa = tree • asana = pose
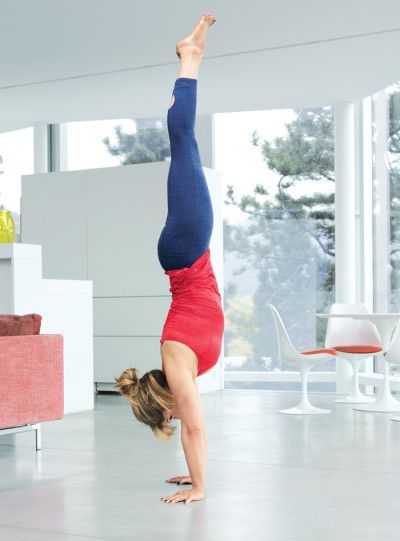
Start from Downward-Facing Dog (Adho Mukha Svanasana) with your fingertips an inch or two away from a wall, hands shoulder-width. If your shoulders are tight, turn your index fingers out slightly; otherwise arrange them parallel to each other. Firm your shoulder blades against your back torso and pull them toward your tailbone. Then rotate your upper arms outward, to keep the shoulder blades broad, and hug your outer arms inward. Finally spread your palms and press the bases of the index fingers firmly against the floor.
Bend your right knee and step the foot in, closer to your hands, Come on to the right toes and extend the left leg back, inner thigh rolling back and squeezing into the midline, toes pointing down. Activate the left leg by kicking through the heel. Engage transversus abdominis, rectus abdominis, your pelvic floor, and your adductors. Then take a few practice hops on your right leg before you try to launch yourself upside down. Take a break in Down Dog or all fours when needed.
From the momentum of your right leg, sweep your left leg through a wide arc toward the wall, immediately pushing through the right heel to straighten the right knee. As both legs come off the ground, engage your deep core abdominal and back muscles to help lift your hips over your shoulders. Hop up and down like this several times, each time pushing off the floor a little higher. Exhale deeply each time you hop.
Hopping up and down like this may be all you can manage for now. Regularly practice strengthening poses, like Plank Pose. Eventually you’ll be able to kick all the way into the pose. At first your heels may crash into the wall, but again with more practice you’ll be able to swing your heels up lightly to the wall, and then you’ll be able to practice without a wall.
If your armpits and groins are tight, your lower back may be deeply arched. To lengthen this area, draw your low belly in and your front ribs into your torso. Reach your tailbone toward your heels, and slide your heels higher up the wall. Squeeze the outer legs together and roll the thighs in. Hang your head from a spot between your shoulder blades and gaze out into the center of the room.
To start stay in the pose 10 to 15 seconds, breathing deeply. Gradually work your way up to 1 minute. When you come down, be sure not to sink onto the shoulders. Keep your shoulder blades lifted and broad, and take one foot down at a time. Come to Down Dog or Standing Forward Bend (Uttanasana) for 30 seconds to 1 minute. Then try again with the opposite leg.
Practice
This yoga video incorporates all five arm balances and inversions, plus some transitions and counter poses, into one smooth, easy-to-follow sequence. Follow along on your own mat to practice the poses you just learned, get a better feel for and understanding of your entire core, and continue building strength and balance. Before you start, take a few slow breaths to settle in, then warm up with 2-3 rounds of Sun Salutations.
Wrap up
In this section, you learned about arm balances and inversions and why a strong and balanced core is vital to success in these challenging poses. You also learned how to do five arm balances and inversions that enable you experience and enjoy the core strength you’ve built throughout this course and continue working those key muscles.
Practice the arm balances and inversions individually when you have a few minutes, or by mindfully inserting them into your regular yoga practice. Or, for more sustained core work, practice the full video sequence. Either way, aim to practice every day for the next week.
